Materials: (I highly recommend reading The Artist's Handbook of Materials and Techniques, by Ralph Mayer, an extremely detailed guide to all kinds of artists' materials. Also, I recommend reading material labels carefully for safety and health precautions.)
Note: Materials for painting in oil are listed here; for acrylic painting, general substitutions are listed in each category. I have painted with acrylics several times, but not enough to be an expert; I just offer general suggestions here. Acrylic paints are now more commonly used than oil paints; however, I've used oils for over 60 years, and prefer their longer drying time for the way I paint, and also their generally longer shelf life. There are now alkyd paints widely available, which are oil-based and can be mixed and used with oil paint; I haven't tried these, so I can't speak about their properties or quality.
There are a huge number of new art materials nowadays, growing every day. You might become more familiar with them on art suppliers' websites, and by requesting that a catalog be sent to you.
Canvas or Other Support:
(See Stretch Canvas for detailed information about canvas panels, pre-stretched canvases, and how to stretch your own canvas.)
Oil Paint:
Oil paints are oil-based. Tubes of oil paint come in two sizes: 37 ml, and 122 ml. The 37 ml size is good for general use for more serious painters; and the largest size is usually used for white paint. White paint comes in several different types: zinc white, flake white, and titanium white. Each of these whites has certain properties useful for specific purposes in painting. Winsor & Newton used to make a good, all-purpose white called Winsor White, however I believe that has been discontinued. Oil paint can be very expensive; certain pigments, like Winsor & Newton Cobalt Violet, can sell for almost $100 for a 37 ml tube. Certain manufacturers' paints are more expensive than others: Winsor & Newton, for one. Rembrandt and Van Gogh are usually a little cheaper; and Grumbacher is cheaper still. Winsor & Newton has a student grade paint called Winton, which is cheaper and of fairly good quality. For a serious painter, it is usually worth it to pay extra for the quality you get - but for the beginner or student, the cheaper grade is fine. I'd say that the average Winsor & Newton 37 ml paint tube costs about $10 - some colors less, some a lot more. Unless you are independently wealthy, you will want to get just enough colors to get started. There are paint sets, of course, sold in art stores and some office supply stores. These are okay for a beginner or hobbyist; but if you want to paint seriously, it is good to buy items individually, as your preferences develop. For a beginner's palette, I would suggest: One medium or large tube of titanium white paint; medium tubes of: ivory black, cadmium red medium, cadmium yellow medium, cadmium green, either ultramarine or cobalt blue, yellow ochre, burnt sienna, and burnt umber. Another beginner's palette, the "limited" palette, used by traditional painters, is: titanium white, venetian red, blue-black (I believe Winsor & Newton is the only manufacturer to make blue-black - Payne's gray can also be substituted for blue-black), and yellow ochre. This last palette is good for beginners to learn how to mix colors, the idea being that it is a little easier to learn when you have fewer choices to make.
My favorite colors are mostly Winsor & Newton - Winsor Red, Winsor Blue, Winsor Orange, and Winsor Yellow, for example, are "true" red, "true" blue, "true" orange, and "true" yellow. Lemon yellow is a color you might want to add to your palette at some point, as well as green earth, cobalt or ultramarine blue, alizarin crimson (red), raw umber (gray-brown), naples yellow, viridian (green), vermilion (red), cobalt green, and cobalt violet (some manufacturers make a cheaper cobalt violet). Once you have some experience, you will try new colors and find your favorites. Different pigments (colors) have different qualities; for instance, venetian red is an extremely strong pigment - only a tiny amount overpowers other colors; whereas, cerulean blue is a weaker pigment, easily overpowered by others. Different manufacturers' colors can also vary widely - green earth by one manufacturer may be warmer or cooler than green earth by another manufacturer. It takes experimentation to find manufacturers and pigments you like; and it is good to try a lot of different colors - maybe not in the beginning, but as you get more experience, you will want to increase the breadth of your palette. If you are a painter, seeing all the colors available is like being a kid in a candy store. It is fun to try new colors, and specialty ones like metallic colors, etc., but in the beginning try to limit yourself, so that you can learn how to mix most colors yourself. Pigments and colors also differ widely in their permanence rating; art supply stores have charts where the rating for each color is listed. Try to use mostly the colors with the best or second highest color permanence rating, rather than the unstable, nonpermanent colors. For example, prussian blue has a lower permanence rating than cobalt blue and ultramarine blue. Colors also have a transparency/opacity rating - check this before buying so you get what you are looking for.
Oil paints are generally slow-drying, a quality some people like, and others not. It can take anywhere from 24 to 96 hours or even longer for paint to dry, depending on the color, the thickness of the paint, the time of year, and the humidity level.
Alkyd and acrylic paints are also available; acrylics are water-based. Alkyd is oil-based, and can be mixed with oil paints. Acrylics cannot be mixed with oil paints. Acrylics also are made by different manufacturers, at different grades. They tend not to last as long in the tube as oil paints, so if you don't paint a lot, getting a smaller size might be a good idea. Acrylics also come in jars in liquid form. They also dry a lot faster - they can even dry and harden on your brush while painting - I know, because that happened to me. There are retarder/extender materials you can buy with your acrylics to keep them wet longer. If you like to paint quickly, acrylic paints may be your best bet. It used to be that acrylic colors were not as rich or luminous as oil paints, but that has improved.
Usually, but not always, the same brushes can be used for oil and acrylic painting. Brushes for watercolor will be labeled as such. There are two basic kinds of oil/acrylic brushes: bristle and "sable" brushes. Bristle brushes are harder and off-white colored; "sable" are brown and much softer. Real sable brushes are made from the hairs of minks. Sabeline or Sablette is often mixed with synthetic hairs. A good sable brush can be very expensive - I once saw one about 1/16" round selling for $100 - and that was many years ago. (There are many which are not nearly that expensive, though; nowadays, I see fewer pure sable brushes, and the natural/synthetic mixes are lower in price, often for $20 or less, and sometimes you can get a fair quality brush for $10 or even less). If you like the qualities of a sable brush, as I do, you are willing to pay extra for a natural one, or a natural/synthetic mix. Brushes come in other types of hair, such as ox or camel (actually made from cattle and squirrel, goat or pony, respectively). These types are not as good a quality brush, for control reasons, but they are generally cheaper. Brushes are a very personal thing with painters - try different ones and see which you like best. I think bristle brushes are generally better for blending the colors together. Since I tend to put separate touches and layers of color, the softer sable suits my temperament better. There are also different types of brushes: rounds, brights, flats and filberts. (See Illustrations 1-4), as well as those designed for custom uses, such as fan brushes. These different shapes, like golf clubs, have certain attributes better suited for one technique or another. Rounds are good for line work, and detail; brights and flats are better for massing larger areas and sharper edges; and filberts, if you get a good quality one, are good for linear painting and large masses, even in the same stroke. Brights and flats have square edges - good for more structural painting, like Cezanne. Hairs on brights are slightly shorter than flats. For a rounded, softer feel, rounds and filberts do well. Sizes of brushes go from teeny-tiny to one or two inches wide. They are numbered on the handle - the smaller the number, the smaller the size (generally from 1 to 10-16 or so), but sometimes a manufacturer will have the larger brushes with smaller number sizes. Try not to cling to the smaller sizes - try the larger sizes to avoid getting too picayune with detail - especially in the early stages of the painting. Oil paint is called the most forgiving medium - that means that if you do something you don't like, you can go over and over it to your heart's content, and nobody will know the difference, as opposed to ink or watercolor, where every stroke can be a death-defying act.
Mediums:
A medium is the vehicle painters use when painting, to mix with their tube colors, for various purposes, such as thinning or thickening the paint, or to add varnish, which can lengthen the life of the paint, or deepen and enrich the color in a painting. There are many mediums available for the painter to use. I recommend reading The Artist's Handbook of Materials and Techniques, by Ralph Mayer, for an exhaustive report on the different mediums available and their uses, precautions and limitations - for example, some oils and varnishes can yellow or darken with age. Again, the medium used with oil paint is a very personal thing for each painter. Some prefer a simple mix of refined linseed oil and distilled turpentine; others add varnishes, such as copal or damar, to give the paint a shine which also makes the colors richer. Retouch varnish can be used to give a finish in areas that have dried matte, or to retouch an area of the painting. Some of these combination mediums come already prepared. Trying different mediums is the only real way to know which works best for you. Different oils also do different things; linseed oil and stand oil have different properties and are good for certain purposes. Added oil tends to make paint more viscous, like butter; adding distilled turpentine makes it thinner, as water would do. But don't use cheap, regular turpentine as a medium - that is only good for cleaning brushes - use only distilled turpentine as a medium in painting. Most mediums come in small or medium glass jars; refined linseed oil comes in a larger size.
Acrylics are water-based, which means that the medium used will be water. Other materials are available, however, to alter the acrylic paint in one way or another, such as retarders and extenders, which keep the paint wet for a longer time than normal; and other additives which serve various purposes, such as thickening the paint. Consult the manufacturers' labels on these materials for information on their properties and uses.
Mediums are best used sparingly, however, according to art conservators concerning the permanency and stability of the paint layer on the canvas. I use a little bit of refined linseed oil mixed with a smaller amount of distilled turpentine; the thinner I want the paint, the more turpentine I use.
For students and beginners, cheaper brushes are fine. For more serious painters, it really does pay to pay extra for a good brush. Winsor & Newton brushes are my favorite; Robert Simmons and Kolinsky sable are also good. Grumbacher is a cheaper alternative. A good brush will hold its shape better, last longer, generally do what you want it to do in terms of the brush stroke, and not lose individual hairs while you're painting. Occasionally, you can find a cheap brush that works well. Again, you need to experiment to find out what works for you, for what you want to do.
Cleaning Brushes: After using acrylics, wipe off excess paint with a rag, and wash brushes right away in lukewarm tap water and a small amount of mild soap. After using oil-based or alkyd paints, wipe off excess paint with a rag, and use distilled turpentine right away to remove much of the paint, then finish up with mild soap or commercial brush cleaner (sold at art suppliers) and lukewarm water. Don't let your brushes sit for long still coated with paint. There are a number of commercial products to clean oil brushes: a green bar soap sold in art supply stores, and other items. You can roll the brush in a little cleaner in the palm of your hand; make sure the brush is clean of any remaining paint, including down by the ferrule (the metal part), but try not to skewer the brush hairs around too forcibly when cleaning. When clean, I rub it lightly once against a clean towel to dry it; it doesn't have to be totally dry, just damp. Make sure that you reshape the brush into its natural shape while damp. (See also Caring for Brushes, below.)
Caring for Brushes: Always keep brushes either flat, or standing with the bristle end up, not resting on its hairs; I keep mine in jars or coffee cans. Keep the brush hairs from touching anything when they are still damp; if lying flat, leave the bristle end extending from the edge of the table. There are various cloths and containers to keep your brushes in, if you like, sold in art supply stores or online at www.utrechtart.com, along with most other art materials.
All painting materials, and brushes (below) can be bought at an art supply store, or online at www.utrechtart.com, www.dickblick.com or www.jerrysartarama.com. Some art supply sellers have their own line of brushes and/or paints, often for less cost than name brands, which vary in quality.
Paint Palette:
Palettes can be purchased ready to use, in wood, metal, plastic, glass, and paper; paper palettes come in a pad. They come with and without a thumb hole; some artists use the hole, some not. Sizes usually come in small (about 9"x12") and large (about 12"x15"). Pads of paper palettes are convenient, because each sheet is disposable. Palettes in wood, plastic, glass and metal are usually cleaned after each use. These palettes of different materials come in various colors; what color the palette is affects the way the colors are perceived. Usually, either white or other light or medium neutral color is desired; painters usually have a preference. I prefer a white paper palette; paper palettes also come in light gray. Wood can be natural in color, or have a darker stain. When you are painting on a gessoed canvas (white), you might prefer a white palette, since you will be able to judge more accurately how the color will appear next to the white of the canvas, since color relationships are a relative matter. (When painting, you need to keep this in mind when mixing - next to the white of the palette, a color will appear darker than if seen against a gray palette.)
To clean palettes of wood, plastic, metal and glass, wipe with a paint rag, then wipe clean with turpentine; or you can scrape clean with a blade (palette knife or other blade). I always try to only put out as much paint as I'm going to use - I hate to waste; although there are products made especially for keeping excess paint moist for later use, in art stores, catalogs, or online. Plastic wrap can also be used to keep paint fresh for a few days.
Palette and Painting Knives:
Palette and painting knives are very handy implements. They can be used for mixing paint colors, and also for painting. It's a little like frosting a cake to paint with a knife, and is a good technique for a beginner to try. (However, art conservators tell us that when paint is applied thickly, it will tend toward later damage or impermanence, such as cracking. But it's fun!)
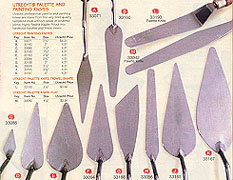
Knives come in a wide variety of shapes and sizes (see Illustration 5, above); certain shapes tend to lend themselves better to painting, or to mixing. I use a palette knife for mixing, and I've found that I need to buy one with a strong joint connecting the blade to the handle; I've had a couple of them snap off at this joint when mixing paint. Some are long and flat, like butter knives, and some are shaped like garden trowels, with the blade slightly lower than the handle. I've found this last one best for mixing paint. These can also be used to scrape paint, either off of the canvas, or off of the paint palette.
Container(s) for Mediums:
You will need a container to hold your medium. There are commercial ones sold, either one or two small metal cups which can be clipped onto your palette. You can put different mediums in each cup, or have your mediums mixed together in one cup. I used to use these, but I have used baby food jars for many years now, and prefer them. They are bigger, made of glass so I can see how clean the medium is, or if it needs to be refreshed or thrown out, and they have lids, so there is less air contamination or evaporation (or smell). I clean them out and reuse them until they are too dirty to use anymore.
An odorless alternative to turpentine is now available, called turpenoid, which is safer to use. I haven't used it - I actually like the smell of turpentine - it has so many good memories for me.
Easel:
Easels can also be very expensive. It is possible to paint without them, but again, they are very nice to have. They come in a wide range of styles, sizes, materials, and prices. Wood is the traditional material, and the one I prefer, but aluminum easels are portable, lightweight, and generally a lot cheaper. I like the heaviness, and therefore the stability, of a wooden easel. Easels can range from table size (sits on a table) to about 7 feet tall (or higher). The size you need depends on the size canvases you paint. The wooden ones come in a basic style, where you can adjust the vertical tilt, the height of the bottom of the painting, and clamp tightly at the top of the painting. There is also a series of elaborate easels, on wheels, and with heavy-duty wood bars and turning hand screws to handle large-sized canvases. These can run into hundreds of dollars. An average wood easel can sell for about $200-300, but you can find a more basic, cheaper one for $100-200, and sometimes they go on sale. For a beginner or hobbyist, an aluminum easel might work better. These tend to be smaller and lighter, and many fold up for portability (painting outside, for instance), and for putting away when not painting. They also can be quite a bit cheaper.
Charcoal or Other Drawing Tool:
Charcoal or other drawing tool is optional. Some painters, especially beginners, like to draw the image before they start to paint. Vine charcoal sticks are good for this purpose, as anything with a sharp point, like a pencil, can leave a dent in the canvas, or even damage it (permanently). In this latter case, the paint will eventually crack, and is almost impossible to fix, because it will keep cracking forever. Sketching lightly in charcoal can give the beginner a little more confidence. Try to avoid using any more charcoal than necessary - it can mix with the paint, and make it look "dirty." Just keep a faint outline to follow. When you have more experience painting, you may be comfortable sketching in your image with a brush and paint, in lines or in light washes - or you may not need or want to sketch anything first - you may just dive in!
Varnish:
The final material used in oil painting is varnish. There are varnishes used with the oil paint, to make paint thinner, more manageable, and more glossy, such as copal or damar. There are retouch varnishes to make matte areas of the painting more glossy, and to repaint areas of dry paint. Then there are final, or picture, varnishes, which add a protective coating to the final painting, to help it last for many years. Varnishes are available as glossy and matte. The final varnish for a painting should only be done when the painting is completely dry. This means a minimum of 6 months after the painting is finished. If the oil paint has been applied in a thin layer, 6 months is usually sufficient, however, in humid weather paint takes longer to dry. If the paint has been applied in a thicker layer, it will take longer than 6 months to dry completely.
When applying the final varnish, do so on a low-humidity day, or in a low-humidity indoor environment, to avoid a whitish "bloom" caused by humidity. If applying picture varnish with a brush, use a 2-inch or wider brush, to avoid streaking. Work quickly, and try to cover the painting in one or two strokes, rather than fussing with it. Picture varnish comes in a spray can now, also. This can be applied in thin coats, applying each coat only after the first has dried.
Varnishing a painting is tricky. If you are unsure about what kind of varnish to use, or how to apply it, have a professional do it. This can be a good picture framer, a better-quality art gallery, or an art conservationist. I recommend reading the varnish section of Ralph Mayer's book, The Artist's Handbook of Materials and Techniques, which gives a comprehensive description of varnishes and how to use them. There are advantages and disadvantages to each type of varnish. As far as varnishing acrylic paintings, I am not familiar with this, and I would recommend consulting Mayer's book, or asking a qualified art supply store person, or a manufacturer of acrylic paints what the best varnishing method is for their paint.
Illustration 1: Sable/Sablette Brushes - From the Utrecht catalog, from left to right: Two sable brights; two sable rounds; one sablette (part sable, part synthetic) filbert.
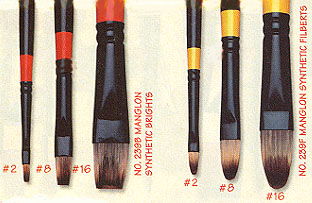
Illustration 3: Synthetic Brushes - From the Utrecht catalog, from left to right: Three synthetic brights (size #2, #8 and #16 ); three synthetic filberts (size #2, #8 and #16).
Illustration 2: Bristle Brushes - From the Utrecht catalog, from left to right: Two bristle brights (size #4 and #10); two bristle filberts (size #2 and #8); two bristle rounds (size #2 and #8); two bristle flats (size #2 and #8)..
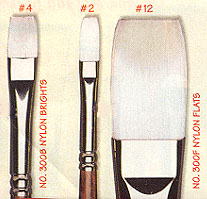
Illustration 4: Nylon (Synthetic) Brushes - From the Utrecht catalog, from left to right: One nylon bright (size #4); two nylon flats (size #2 and #12).
Brushes: Generally, rounds are good for line and detail; flats and brights are good for larger masses and sharp edges; filberts are good for larger masses and line. The only real difference between flats and brights is that flats have longer bristles. Brush sizes differ widely among manufacturers; sometimes the higher the number, the larger the size, but other times they are numbered in the opposite way. Just check the catalog or manufacturer to make sure what you are getting, if you are ordering from the catalog or online. Also, brushes are made of natural or manmade hairs, and sometimes made from a combination of natural and manmade hairs.
Illustration 5: Palette and Painting Knives - From the Utrecht catalog, various sizes and styles of palette and painting knives.
Thin canvas sheets come in pads, which are ready to use. You can also use canvas panels, which are cheap and ready to use, however, their permanence is limited. Pre-stretched canvases are convenient, and already primed with the necessary undercoating for painting, however they are more expensive in the long run than stretching your own canvases. Linen or cotton fabric canvas is used to stretch your own canvases. All these types of canvas are sold at art supply stores, some office supply stores, and at www.utrechtart.com and other online merchants. Canvas fabric comes in linen and cotton (they both come in various levels of quality and thickness); linen has a smoother feel and is nicer to use, but is more expensive. Both cotton and linen come unprimed and primed; primed means that the necessary undercoating of gesso has already been applied, and the canvas can be stretched over your wooden stretchers, and painted on right away. Unprimed means that you need to put two coats of gesso on the canvas (after it has been stretched over the wooden stretchers). (See Stretch Canvas for directions.) Canvas fabric comes in three weights - the middle weight usually works well for most users, and sells for about $10 a foot, about 60 inches wide or less; usually getting 1 yard or more saves a little money if you plan to paint more than one painting. Stretching your own canvases is good if you plan to paint more than a few canvases, or if you plan to sell your work. It takes a little while to get the knack of it, but once you do, it becomes routine, and even enjoyable in its own way, as you have a real connection with the stretched canvas before you start to paint on it; plus, it has a more natural feel than the pre-stretched kind; and the "trampoline-like" feel to it is nicer than the harder canvas panels. When you stretch your own canvas, you will also need to put two coats of gesso on it before painting on it - see Stretch Canvas for instructions on how to prime your stretched canvas.
Supports other than canvas that can be used include masonite, wood panels, and heavier paper. These must also receive two coats of gesso priming before painting. Masonite (the smooth side) must also be sanded lightly before priming with gesso.
For acrylic paints, you can also use any of the above canvas types, and the gesso priming is done the same way as for oil paint.