The ancient Greeks were the first to explore the human figure in a naturalistic fashion, in their classic sculpture. They were interested in portraying the ideal human, as it reflects the divine. The harmonious proportions, the strong sense of volume, and the feeling of perfection in Greek figures is the very definition of the word 'classical' - meaning great and timeless.
During the following era of great religious art, this naturalistic approach was subordinated to the expression of the divine - Biblical figures and themes. When the Renaissance arrived, men of learning and curiosity looked back to ancient Greece and Rome, and tried to re-create the classic figures, in sculpture, painting and drawing. Leonardo da Vinci and Michelangelo were possibly the two greatest artists of this period. They, along with other Renaissance artists, wanted not only to reproduce the image of the human figure, they wanted to do so for the first time in a 'scientific' manner, that is by studying the inner parts of the anatomy, as well as the outer parts. At this time, science as we know it was just being born, and many wanted to explore and study everything around them, rather than just accepting religious doctrine unquestioningly. For artists, this included the surreptitious study of cadavers - to study the muscles, bones, etc. of the human body. Since this was against church doctrine, it had to be done in secret.
In this way, the study of anatomy for doctors and artists was begun (during the 1400's in Europe). A new standard was set for artists in the representation of figures for the following centuries. Gradually, however, the emphasis on correct anatomy was superseded by other concerns: pictorial concerns, and expressive concerns. When Rembrandt drew and painted the figure in the 17th century, he was more concerned with pictorial composition and expression than with anatomy, particularly with his portraits and self-portraits. This Rembrandt drawing shows a real, flesh-and-blood woman, rather than an idealized form. By this time, the classical nude in art was being replaced by the depiction of actual people in real settings, often clothed.
Ingres, in early 19th century France, like other Neoclassical artists, held onto a figure drawing tradition where line, order and harmony were paramount. Courbet wanted to paint with realism - showing the world as it 'really' is, rather than the ideal figures of the Neoclassical artists. By the time 1850 came, European artists were beginning to question many of the artistic traditions handed down to them (i.e., Manet and the Impressionists). Cezanne, although part of the Impressionist group for a time, rejected many of the same conventions, however he held on to aspects of the classical tradition. His drawings of nudes, though done in a modern fashion, still held to the importance of form and volume, having a sculptural quality to them. Degas also is considered an Impressionist, though unlike them he also held onto a classical sense of figure drawing.
The new approach ushered in by Manet and the Impressionists was continued in the 20th century by artists such as Matisse, who rejected naturalism and classicism, in favor of a pictorial representation of the figure, where the subject matter was subordinated to the overall composition and formal elements (color, space, etc.) of the painting. Here, anatomy, correct proportions, and even three-dimensional form no longer played an important role - the expression was the main concern, as well as formal inventiveness (although Matisse and most artists, as students, still studied anatomy and drew from the live model until fairly recently). Matisse was also concerned with an arabesque quality (curvilinear) (a little down the page).
Of course, during the 20th century, many artists stopped painting representationally - with only a certain number of artists still interested in the figurative tradition. Of those who continued to depict the human form, most did so in a non-traditional fashion, such as Larry Rivers (click on image to enlarge). Rivers began painting in the 1950's in New York, when Abstract Expressionism, with its gestural concerns, was reigning. He continued this gestural expressiveness, but his images were also recognizable (he is generally considered to be more a part of the Pop art movement, so his attitude was more ironical than representational).
On the west coast of the U.S., Richard Diebenkorn was another artist who during the 1950's was influenced by the sweeping forms of Abstract Expressionism. In addition to his somewhat abstracted landscape paintings, he did figure studies, such as this link's drawing, done with brush and ink, which has a bold, graphic quality. Again, though some artists are still depicting the human form, they are doing so in a very non-traditional manner. In some cases, the figures depicted have become more anonymous - just pictorial devices, rather than individuals. Philip Pearlstein, who paints in a very realistic manner, still presents figures with this contemporary attitude - heads are often cropped in his watercolor and oil paintings, stemming from his desire to paint the human form "because it is the most interesting compilation of forms available." Like Cezanne, he is looking for the abstract underlying forms - spheres, cylinders and cones, rather than individual human beings. Cezanne, however, though he concentrated on the underlying geometric forms, still managed to express a sense of an individual human presence, often very strongly, as contrasted with Pearlstein's clinical approach to the figure.
Another development since the Renaissance is the replacement of the classical nude with clothed, ordinary people, perhaps a manifestation of the more casual nature of modernity. Idealized figures were replaced by average, imperfect people dressed in casual clothing, and in casual poses. Chuck Close, an American photorealist, painted excruciatingly accurate portraits in the 1960's, from photographs. (Virtually every hair on their heads and bodies was carefully painted.) He has since developed a more painterly approach to his portraits of friends, many of whom are also artists. His paintings of the last 10 years are done in an inventive way - the portrait paintings have a superimposed grid of squares on them, which are each comprised of small abstract notations, such as circles and dots, of color. Close up, the images are abstracted; further away, these squares of marks coalesce into a finely crafted portrait and painting. (Chuck Close is also interesting for another reason; in the 1980's he experienced a health crisis which resulted in his being paralyzed from the neck down. He has been in a wheelchair since, and does his artwork with the use of electronics. This recent work has been very influential in the art world, and his new approach to crafting images has been imitated in commercial art images, such as magazine ads and illustrations.)
Materials
Many types of materials can be used in figure drawing, but the most common are pencil (hard and soft), pen, charcoal sticks and pencils, conte crayons of various colors, brush and ink, and even watercolor, pastel sticks and pencils, and oil and acrylic.
Pencil - Drawing pencils come in hard (H), medium (HB), and soft (B). The harder the pencil is, the more fine the line will be. Generally, in fine art softer pencils are used (3B to 6B are the most commonly used), to produce shading in a range of tonal values (lights and darks). Soft pencils are also able to be erased, whereas hard pencils are less flexible in this way. You should try different levels of hardness and softness; the higher a number, the harder or softer a pencil is (6B is softer than 2B; 4H is harder than 1H). Pencils are of course great for line work, but cross-hatching and shading can also be done with them. Pencils work well with both quick gesture studies, and longer poses. You could use a pad of paper as a support, or you can buy a drawing board of wood, masonite or heavy cardboard. You also will need an eraser; generally kneaded erasers are used for fine art drawing; they can be kneaded to expose the cleaner inside parts of the eraser. You also will use a pencil sharpener, or a single-edged razor blade, to sharpen your pencils.
Charcoal - Most charcoal used is black, although white charcoal is also available. All forms of charcoal come in a range from soft (B) to hard (H); HB is in between. Charcoal comes as sticks, and as pencils. Soft charcoal sticks can be either willow or vine charcoal, and are made of burnt willow or vine, respectively. (Vine are very thin sticks usually about 3-4" inches long, and about 1/4" around.) Willow sticks vary from about 1/4" around to up to 1" around. The hardest charcoal stick is called compressed charcoal, and is similar to using a conte crayon; they are about 1/4" round or square, and 3" long. Soft sticks come in boxes of about 10-12, or in packs of 3 or 4 sticks; compressed can also be bought individually, and are usually a little more expensive. They last a lot longer than the soft sticks, though. Sticks (especially soft) are good for line work, but are best for masses of darks and lights. Compressed charcoal will get the darkest blacks, however it cannot be smeared and blended as well as soft charcoal. Charcoal pencils are often a little bigger around than regular pencils (so they need a sharpener with a bigger hole). Carbon pencils are also available, which are similar to charcoal pencils. Pencils are better for detailed line work. Soft charcoal is especially suited to figure drawing, as it can be erased very easily, for correcting your drawings, and is good for both quick and longer poses. You would also need a support, such as a pad of paper, or a drawing board of wood, masonite or heavy cardboard. You will also need a kneaded eraser, and possibly a chamois cloth for wiping and smearing; and possibly stumps/blenders for blending (round rolled paper stumps, with points at both ends), if you like to blend areas of your drawing. (See Paper below for papers used with charcoal.)
Conte crayons - Conte crayons, like charcoal, are a traditional drawing instrument. They come in stick form, either round or square, and are very hard; they are usually about 3" long. They are good for both line and tonal masses, however they can't be erased or smeared as well as soft charcoal. They are similar to using compressed charcoal sticks. They come in a variety of colors (which can be bought as a set), but the traditional conte colors are gray, black, white and sanguine (red-brown). They are excellent for figure drawing, as they produce a variety of tones, and their rich intensity gives a sense of volume to the forms. (Seurat used conte for his drawing studies of figures for his paintings.) With the various colors and values, you can work on a paper of a middle gray tone, and use dark gray and black for the dark areas, and white and light gray for the highlights of the figure. Using sanguine (red earth color) is also interesting, giving a feeling closer to flesh color. Conte is good for short and longer poses. You would also need a drawing support, such as a drawing board of wood, masonite or heavy cardboard, or you can use your pad of drawing paper as a support.
Ink - This is a more challenging medium for figure drawing, but that can also be a good quality for use by an art student. Ink comes in small bottles, in many colors and price ranges. Higgins is a common brand name for traditional black ink for drawing, but other colors can also be used. Brushes to be used with ink can be watercolor, sumi (Oriental brush), and bamboo pen/brush (which has a pen point on one end and brush on the other end). Pens can also be used with ink, which would be better for line work. With a brush, you can work in washes, as well as line, to get a sense of volume, by diluting with water. With this method, you would also need a small container for water; and the paper you use needs to be suitable for wet mediums (charcoal/pastel paper and newsprint would not work with ink; you could use either watercolor paper or drawing paper which can be used with wet mediums). "Dry brush" is also a good technique to try; it uses a brush with ink and very little water for a grainy effect. Ink is also used for calligraphy, in western and in Oriental art. (See also the paragraph below about Chinese painting.) Ink can be used for either short or longer poses, but may not be as good for the shortest type of pose, for instance short action or gesture poses. You also would need a support for your paper, such as a wooden drawing board, or piece of masonite or heavy cardboard.
Watercolor - Watercolor comes in tubes, and in trays of solid pigments. As with ink, you would need suitable paper - either watercolor paper or drawing paper which will accept wet mediums. You can use either watercolor or bamboo brushes, and you would need a special tray for mixing watercolors (which has a number of wells for mixing). You can use leftover jars and other containers, but a mixing tray makes mixing easier. There are sets of watercolors, or you can buy individual small tubes of paint. White is available, but watercolor purists like to leave the white of the paper showing for the white areas. Watercolor would work best for slightly longer poses, rather than the quick croquis or action poses. Watercolor paper comes in block pads, as well as individual sheets (for individual sheets you would also need a support, such as a drawing board of wood, masonite or heavy cardboard). Sheets may need to be pre-stretched before painting.
Oil or acrylic paint - For longer poses, oil and acrylic paint can be used, on stretched canvas, canvas panels, or pads of canvas sheets. In this case, you would need all the materials necessary for these mediums (see Painting II: Materials and Painting I: Stretch Canvas). In art school painting classes, often a large "environment" is created around the nude model - with furniture, swaths of fabric, large plants, etc., so that the student is making a painting, as well as a figure study. (Shorter poses can also be done, for instance on a pad of canvas sheets.)
Paper and other supports - You can use a small sketchbook to carry around with you, from 6" x 8" to 12" x 17" or so. These vary in price - you don't need an expensive one for sketching purposes. You can also buy a hardbound sketchbook, if you want to spend a little more money. For larger quick studies, newsprint is the cheapest paper to use; it comes in pads up to 18" x 24". It works with pencil, felt tip or ballpoint pen, charcoal, and conte crayons. For wet media, you will need paper which can handle liquids. Usually, a pad of paper will list on the front all media suitable for it. Sketching and drawing pads are available; they are more expensive than newsprint. Sketching paper is usually cheaper than drawing paper; these both can handle dry mediums. A better quality drawing paper for longer studies is Strathmore 400 series. This can be used with all dry mediums, including pastel and charcoal, however pastel and charcoal papers are specially made for both of these mediums, and are interchangeable for both. They come in pads up to 18" x 24", and have a "tooth" designed to hold the little pigment particles, and also come as individual sheets of 18" x 24" or 19" x 25". Charcoal paper usually comes in white and basic and neutral colors; pastel paper comes in all sorts of beautiful colors, in pads and as single sheets - 19" x 25" sheets can cost $2 or more each. For ink and watercolor, you can use watercolor paper, which comes in sheets and pads; individual sheets must be "stretched" and taped before use, but pads come as "blocks" where the sheets are all joined, so the paper stays in place, and the paper can be used without any preparation ahead of time. (These are usually smaller than 18" x 24".) For oil or acrylic, canvas sheets in a pad can be used - these are ready to use; canvas panels up to 48" are available and ready to use; pre-stretched and pre-primed canvases up to 48" are available and ready to use. To stretch your own canvases, see Stretch Canvas and Painting Materials.
Pen - Many types of pens are available for use, from a felt tip to Rapidograph pen, to fountain pen or even ballpoint pen. Some are refillable, and some are just used until they run out of ink. They come in many colors, and vary in the type of flow they have, and the type of image they create, and are obviously great for line work. (See also Ink, below) Pens are good for shorter and longer poses of the model. You need to use paper which is suitable for wet mediums (except for ballpoint); usually a pad of paper will list acceptable mediums on the cover. You can also use a pad of paper as your support, or buy a drawing board of wood, masonite or heavy cardboard.
Pastel - Pastel is good for figure drawing; it is relatively quick and spontaneous, but may work better for longer poses, rather than quick or gesture poses. It comes in stick form as hard and soft; softer pastels can be more easily blended than hard pastels. Pastels can be bought in boxed sets from 12 to over 100 sticks, or individually. It is usually cheaper to buy in sets (individual sticks are about $3 dollars apiece). You can get away with buying a smaller set (from 12-30 is a good basic set), because you can "mix" other colors by layering the colors you have over one another. You can also use pastel pencils, which come in different size sets, and which are good for more detailed work. With these, you can also use stumps (also called blenders), if you like to blend areas of your drawing. With pastel, pastel or charcoal paper is usually used, because it has a "tooth" to hold the little bits of pigment, however I have also used a good drawing paper, such as Strathmore series 400, which comes in pads. Pastel and charcoal paper also come as pads (from 9"x12" to 18"x24"), as well as individual sheets of 18"x24" or 19"x25". Individual sheets cost $2 or more per sheet, but they come in a range of beautiful colors. Pads also come in assorted colors, but with less of a range of colors. A good brand for pastel paper is Canson. White or off-white pastel/charcoal paper is also available. You would either work with a pad of paper as a support, or buy a drawing board of wood, masonite or heavy cardboard. Degas' ballet dancers are an example of figure drawing done with pastel.
There are also some good books on drawing which include drawing the figure, and have many good illustrations and instruction:
The Natural Way to Draw, by Kimon Nicolaides, Houghton Mifflin Company, Boston, 1969 (great book - good for beginners) (not sure of price, but paperback is very reasonable, and is available at most bookstores and online)
Drawing on the Right Side of the Brain, by Betty Edwards, J.P. Tarcher, Inc., Los Angeles, Distributed by Houghton Mifflin Co., Boston, 1979 (good for beginners) (not sure of price, but paperback is very reasonable, and is available at many bookstores and online)
The Art of Drawing, by Bernard Chaet, Harcourt College Publications, 1978 (excellent book - for intermediate drawing students); paperback, hardcover at www.allbookstores.com, and www.addall.com
A Guide to Drawing, by Duane A. Wakeham and Daniel Mendelowitz, Int'l Thomson Publishing, 1993 reprint (excellent book, but more a history than a textbook); www.amazon.com
All art supplies listed above can be purchased online at www.utrecht.com or www.jerrysartarama.com. You can also get a catalog from either company, and order by phone.
Drawing the nude model has of course a long tradition in art, and is important for students to experience, since they are concerned with learning anatomy, proportions, etc. Clothed, casual figures should also be a part of the study of the figure. This is best done in your normal, everyday environments - home, dorm room, waiting rooms, airports, beaches, school, etc. You can improve your figure drawing skills incredibly by incorporating this casual sketching into your life - and you will do drawings with much more meaning when your friends and family are the subjects. Even unconsciously, your feelings toward them will create not only likenesses, but sympathetic portraits.
You can use whatever materials you feel comfortable with; I would recommend beginning with pencil, felt tip and ballpoint pen, and charcoal. When you have some experience, try pen and ink, or brush and ink. Later, you can also work in pastel, watercolor, or even oil or acrylic, if the pose goes for more than one session.
I highly recommend carrying around a sketchbook for at least a year; this is good for doing quick gesture drawings (see Gesture below), and also for contour and mass drawings. The size can be small - 6" x 8" or larger. Draw in it when you are in waiting rooms, the park, train stations, airports, etc., wherever there are people. When you are in a class, drawing the nude or clothed model, I would recommend drawing on larger paper - up to 18" x 24", and for longer studies.
Getting Started
I would recommend that you have some beginning drawing experience, before you approach the figure, for at least a month or two; or at least do the two kinds of drawing at the same time. (See Contour Drawing, Mass Drawing, Gesture Drawing, and Mechanics of Drawing.) There are a few ways you can find models to work from. The first is, of course, yourself. You can draw yourself either nude or clothed, in various poses in front of a mirror. The second is to draw those in your surroundings - your roommates, friends or family members. This is one of the best ways to practice figure drawing, as people are relaxed in their setting (watching TV, reading, etc.), and therefore are taking very natural poses, and are sitting still. You can also draw people in public places, like airports, train stations, streets, parks, doctors' offices, etc. This is usually good for quick, gesture poses, when people are walking very quickly past you, and is great visual training for you. Thirdly, you can usually find a life drawing class at the local art center. Often, art centers will have a weekly session with a model, available to members and possibly to the public. Art center memberships can cost from $40 to $75 per year, and have other benefits as well, such as being able to enter your work in exhibitions there. For a session with a model, the participants divide up the model's fee (they get paid about $15-20 per hour, sometimes more). These sessions last for 2 or 3 hours; often the model does some quick poses to begin, then settles into a longer pose for sustained drawing. Often, the model poses nude, but some wear clothes, and sometimes they even wear 'costumes' of special clothes, which makes for an interesting drawing or painting. There are also websites that have model poses, which you can order, such as www.artmodeltips.com.
IMPORTANT: Don't be intimidated by drawing the figure. Just think of it as you would anything else - it is a form that you are drawing. You can even forget that it is a figure - just a combination of forms. If you think 'foot,' you may not be able to see the real foot objectively - you may have a preconceived idea in your head about what a foot should look like. Just draw what you see.
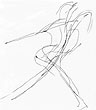
Gesture - Gesture drawing is sort-of the opposite of contour drawing. (See Gesture Drawing for a detailed description.) Gesture is very fast, and is concerned with the action, movement and essence of the figure. Here, you are looking for what the figure is doing, rather than what it looks like. Poses for gesture drawings are very short, from 10 to 60 seconds. The model should take 'action-type' poses, like those found in sports, or figures in motion, as opposed to sitting or lying quietly. The model can hold a pole to lean on in order to take more active poses, leaning forward or back. Also called 'croquis,' these quick poses can also be found in a gymnasium or sports arena; even in airports, train stations, etc., people are seen walking very fast or running, etc., and make great models. This trains the eye and hand not only to work together, but to work together very quickly. It increases concentration, because you only have 10 seconds or so to capture the essential movement of the figure. The essential action line is called the axis - this is the central imaginary 'line' which goes from the top of the figure to the bottom. An example of this would be a basketball player reaching for the hoop - the line from his reaching fingertips to his toes is the line you are trying to get in your gesture drawing. A sense of movement is a very important concept in figure drawing; without it, your figures will seem static, without vitality. Gesture also conveys a non-physical sense of the form - its 'essence,' its essential nature - almost in the sense of Oriental philosophy, such as Zen, where everything in the universe has a gesture, or essential character. Learning to feel this and represent it can add depth to your drawing and painting.
Mass - Mass drawings are concerned with the three-dimensional volume of a form. (See Mass Drawing for a detailed description.) They depict the areas or masses, rather than the contour line, of the figure. The purpose of this exercise is to bring awareness of the solidity of the figure; seeing the weight and tonal masses of a figure will bring a convincing three-dimensional reality to the drawn figure. This is an extremely important concept to learn; even though we know intellectually that the figure is three-dimensional, we have to actually experience this awareness in our drawing, for it to really be internalized. Soft or compressed charcoal sticks and conte crayons are really good for mass drawings. Later on, you can also use brush and ink, pastel or oil/acrylic. The best example I've seen of this kind of drawing is Georges Seurat's conte crayon figure studies for his paintings. (He was a Neo-Impressionist painter in late 19th century France - also called a Pointillist.) When doing mass drawing, you are concerned with tonal masses - that is, areas of light and dark. You become aware of parts of the form as areas, rather than just a flat outline. Seeing the model in color and translating these color areas into their value takes a little practice (sometimes squinting helps). Where light hits the form, you will see a light value (close to white); where shadows fall, the areas will be darker. Then there are middle tones of gray in the figure also. Seeing these, and representing them in your drawing will give a convincing sense of volume. You will use your charcoal or conte stick (breaking it in half might be easier to hold) and draw with its side, rather than its end. You can work lightly and slowly, in a sort-of circular motion, starting at the "inside" of the figure, almost like you are building the figure with clay. Gradually work your way to the outside edges of the figure. When you've established the main form, go back over the areas of the figure that are larger masses - where the "weight" is, and darken them. You can also be aware of light hitting the figure and darken the areas in shadow, but the main thing you are thinking about now is the solid form of the figure.
Combination of Contour, Mass and Gesture - This just means that when sketching or drawing, you can combine the above three exercises in studying the figure. The way these are combined can be a very individual or personal manner. For example, in drawing a pose of 20 minutes or so, you might begin with the central axis, or action line, of the pose, and very quickly draw this (usually curving) line, elaborating it as a gesture drawing. You can then establish the smaller areas within the figure, such as arms and legs, continuing the gesture drawing. Then you might add the contours of the figure (working with line). Finally, you can establish the larger masses of the figure with areas of mass, or light and shadow. There are many possible combinations, or order of these techniques, as well as other approaches. This is mainly just a starting point when you are learning to draw. You can work tentatively, gradually defining the figure.
Shorter poses by the model are good for gesture; somewhat longer poses can be done with contour and mass; and longest poses can include gesture, mass and/or contour.
Pencils and pens are best for gesture drawing, although charcoal or conte can also be used. (You want something that can be moved quickly around the paper; ballpoint or felt tip pen for example.) When doing a gesture drawing, you start drawing the figure immediately, aiming for this central axis line. Once you have established this line (a few seconds), you can go back over it, with your pen in constant motion, getting the smaller areas, such as arms and legs. Rembrandt often did gesture-like ink drawings. Another good example of gesture drawing is the 19th century French artist Daumier, who scribbled little figures, often as caricatures. You are trying to train yourself to see this essential line as quickly as possible, and to coordinate the activity of your mind, eyes and hand in drawing. Do many of these - they will really improve your perceptual skills. Even though you are not concerned with likeness or proportion when doing gesture drawing, when you capture this essential axis movement, it will enable you to get accurate proportions and relationships of the figure. Without this central, unifying central axis, your figures will seem like a collection of separate parts, rather than a connected whole. Seeing the internal gesture of the form (in this case the figure) will also give your artwork more depth.
Blind contour - This is the same as contour, but without looking at your paper at all. You may get some silly-looking drawings, but they are good for training the eye and concentrating, as well as slowing you down.
Other hand contour - Again, the same as the contour, but using the hand that you normally do not use for drawing. This will make you really slow down!
Cross-contour - Regular contour drawing involves mainly the outside edges of the form. Cross-contour means drawing across the form, that is around the "circumference" of the leg or other body part (for example, if you drew a line on the leg, starting in the front and going around until the line joins the starting point.) What this does is indicate the actual three-dimensional form, rather than just the contours of the form. This isn't really a separate exercise; the way you would do it is to first do a regular contour drawing of the figure. Then, on this drawing, you can start at the edge of a form, such as the leg, and draw a line across the leg. Because the leg is a three-dimensional, rounded form, this line will curve as it follows this bulging form (it won't be a straight line across the form). This brings an awareness, for the person drawing and the person viewing the drawing, of a sense of volume in the figure. (See Illustration 9, on the left) (An example of this in brush and ink is an ancient Chinese drawingof a tiger; you can see how the tiger's stripes follow the form of his body, in a curving fashion.)
Volume and Movement
As written above, giving the figure a sense of volume is a critical lesson to learn. We know that the figure before us is three-dimensional, but when we are immersed in drawing, and trying to get correct proportions, etc., it is very easy to lose sight of this. There are a couple of ways to try to bring this volumetric quality home. One is to make three-dimensional models of clay or other material, with an additive method. Start with a "ball" of clay, for instance, and gradually add to it while looking at a model. You don't have to smooth the added pieces into the ball of clay; in fact, when you leave them slightly raised it can make the figure seem more lifelike and three-dimensional. You can use Sculpey to do this - you don't need anything fancy. These don't need to be finished in a kiln, or even saved. This is just to reinforce your awareness of the solidity of the figure. They can be about 3 to 6 inches tall, and don't need any detail, just the basic gesture and mass of the model. Another way to do this is with wire. The wire should be thin, but not so thin that it won't stay in place - about 1/16 to 1/32 of an inch wide. A crafts or art supply store should have this kind of wire. It can be 3 feet or longer in length - the longer the better; you can keep using the same piece over and over again for different poses. You want it to be very flexible, because you will be creating not the contour of the figure, but the whole, rounded figure. Picture a three-dimensional gesture drawing. The wire can start at the top of the figure, then it will go in a more or less circular manner throughout the entire figure, back and forth. The specific way the wire goes is less important than its movement to create a three-dimensional figure, going not just up and down, but around and inside the figure, to form a three-dimensional wire sculpture. Try to keep the wire from wrapping in a regular circular fashion - like in a gesture drawing, the movements will be around, up, down, and through the figure. What the finished product looks like isn't important - what is important is that you really FEEL the sense of volume in the figure. Don't worry about proportion, accuracy, etc. here - just three-dimensional form. You may eventually decide to represent figures in a different, more flat manner, such as Matisse did - but as a student it is really good to get a sense of volume. See Cezanne's figure drawings, where he used more than one contour line, which also gives a sense of volume.
Achieving a sense of movement in figure drawing is also important. This doesn't mean just in the sense of action, but also a sense that even though the figure is not moving, it is capable of movement. A sense of a vital, living, breathing, thinking, feeling person in a figure is a great achievement, as with Rembrandt's figures. Gesture drawings are good to achieve this, but this can be accomplished even in contour or mass drawings, in various ways. Larry Rivers achieves a great sense of movement in his drawings, by various means: he uses fragments, rather than a total image; and by erasing and smearing, he creates a sense of visual flux. This sense of motion also can contribute to a sense of three dimensions; rather than a static, flat contour line, the figure seems to be a pulsing form in space. This is a modern quality, perhaps reflecting the increased speed in the world over the last 100 years.
Proportions
When learning to draw figures, getting the correct proportions of the model is important. In academic art, correctness of proportions and accuracy continue to be important. With much modern art, this emphasis on accuracy has ceased to exist. Most artists have studied the figure, and learned to master this skill, but many leave it behind once they mature, because they now place their emphasis on other concerns, such as pictorial or expressive purposes. And in the last 20 or so years, this academic training has decreased in the training of art students, giving way to a more contemporary, conceptual approach to art. It seems to me that learning to draw (which is really learning to see) is still important for art students; it is not an end in itself, but a means to an end. Even though visual art is now often concerned with areas other than visual, I feel that an artist still needs to learn to see; and drawing seems to me to be the best way to do this. By learning to see the external world, an art student trains his/her eye, and develops perceptual skills. By a mysterious process, this visual discipline often results in a mature artist who can see not only outside himself, but inside himself, and see also the intangible, invisible realities of the world.
Once an artist learns to see, he or she can theoretically draw anything, without knowing the "formula" or secret to drawing such-and-such a form. Seeing is seeing is seeing. Rather than rely on facts of anatomy, proportion, etc., an artist can always see correct relationships with his/her trained eye, of whatever he/she is looking at.
This process of really learning to see usually takes years; it accumulates gradually, so that within months, a student can begin to see relationships of size, shape, etc. in the figure. But after years of looking, an artist will develop a discerning and acute vision. I can remember being in life drawing class, and having my instructor point out my inaccuracies of proportion, placement, etc. At the time, it was frustrating to me that he or she could see things so clearly, and I could not. It took years for me to achieve the same plateau, and even now sometimes getting all the correct relationships can be difficult, even tedious. So, don't get discouraged - it will eventually be easier for you. Much of this ascertaining of correct proportions and placement is merely mechanical. When you are looking at the model, you can establish correct placement by comparing the various parts of the figure to a stationary horizontal or vertical line. For example, if you hold a pencil vertically next to the model, you can determine the angle of the leg by comparing it to this vertical pencil. If the angle of the leg forms a 45 degree angle with the pencil, you can see this. Similarly, if you compare the angle of the foot against a pencil held horizontally, it might be an angle of 20 degrees, for instance.
You can also compare the various parts against each other to determine size. For instance, if the distance from the knee to the foot is twice as long as the distance from the elbow to the hand; or if the shoulders are three times as wide as the head. Standard proportions of the body are: the entire standing figure is 7 to 8 times larger than the head; the vertical middle of a standing figure is located in the groin area; the width of the shoulders is three times that of the head; the arms extend to just short of midway between the groin area and the knees. There are other such generalized relationships within the figure; but of course people vary widely in these relationships. The best way is always to determine the ratios of the figure in front of you by comparing the parts.
To determine positions of the various parts of the figure, you can compare vertical and horizontal alignment. For instance, in a figure who is leaning toward the left, their head may be directly above their right foot; their left hand may be a little higher than their hip, etc. Checking all these relationships of position vertically and horizontally will eventually produce the correct positions. This can seem like a tedious process, but it is valuable training for the student.
Anatomy
During the Renaissance, when people were just discovering the external world, and developing what we now call science, they were concerned with measuring, studying and quantifying the world around us. This included our bodies, too - physicians, as well as artists, wanted to investigate the world and everything in it. In the early art academies which were set up in Europe at this time, the study of human anatomy was therefore very important, and continued to be so until the early 20th century. In these later times, however, artists began to be less interested in scientific accuracy, and more interested in pictorial and expressive concerns. Thus, modern art was born. In art schools, the teaching of anatomy was continued until recent times; in some academically-oriented and traditional schools, it is still taught. But generally speaking, the teaching of anatomy to art students has become less important. We are in an age that no longer needs to discover the scientific basis of many things, including anatomy; this has pretty much been figured out by now. So, artists became interested in other areas to explore visually.
Optional - An easel is not necessary, but if you plan to draw or paint a lot, it is a great thing to have. Large studio easels can be very expensive (hundreds of dollars), in wood or metal; but less expensive easels are available, even in the larger size. There are also cheaper easels, such as smaller table easels, portable easels, and lightweight metal easels. They also go on sale occasionally, at www.utrecht.com. If you take a life drawing class or attend a model session at an art center or school, some standing or seated easels are usually provided.
For figure drawing, another optional tool is a good artists' anatomy book. Some possible books are: George Bridgman's Life Drawing, or Constructive Anatomy, Gray's Anatomy, Atlas of Human Anatomy for the Artist, by Stephen Rogers Peck, and Human Anatomy for Artists: The Elements of Form by Eliot Goldfinger. Dover Publications also has a list of artists' anatomy books for artists.
Drawing board - The best kind of drawing board to use is a wooden one, about 1/2" thick, 18" x 24" in size; it has metal embedded at each long end. They are not cheap, but they provide a firm, smooth surface that will last for many years, without bending. You can also use a piece of masonite (the smooth side), or thick, heavy cardboard, but these can bend, making it harder to draw. You can also just use the drawing pad itself as a support, but this also is not an inflexible support. With the wooden drawing board you also can use push pins to tack separate sheets of paper on; with masonite or cardboard, you will need metal clips to attach single sheets.
Pencil sharpener or single-edged razor - For pencils and hard charcoal, you can use either a sharpener or a single-edged razor (aimed downward and away from you). Many charcoal and carbon pencils are larger than regular pencils, so you would need a sharpener that also has a large hole.
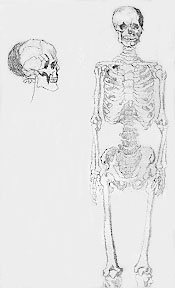
Studying anatomy can be a very useful tool for the figure drawing student, but it can be approached from the viewpoint of the artist, rather than the scientist. Memorizing the names of the bones and muscles, and being able to identify and draw them correctly will certainly do you no harm, and will probably help you. But this is not necessary, unless you wish to become a medical illustrator, or an artist who specializes in anatomically correct figures. If you buy an anatomy book, therefore, one written with artists in mind may be more helpful than a medical anatomy book. Unless you have a major interest in anatomy, I would suggest getting an anatomy book for artists, and doing drawing studies of the images in the book. I have included three such studies that I did when I was in art school: one of the skeleton, and two studies of muscles. If you do some studies like this of the skeleton and the muscle groups, this will be sufficient for your understanding of anatomy. Schools often have a resident skeleton for the use of students - drawing from this will also be instructive.
Description of bones and muscles of the leg and hip: The leg consists of two parts, the thigh and the calf. The thigh contains a bone called the femur, the longest and strongest bone in the body, which extends from the hip down to the knee. Tendons in the thigh make it possible for people to move their legs. The front part of the thigh consists of a four-part muscle called the quadricep; they allow a person to straighten the leg at the knee and bend the thigh at the hips. Along the back of the thigh are three long muscles called hamstrings. The lower leg contains two bones - the tibia (larger) and the fibula (smaller). The calf consists of seven muscles located at the back of the lower leg. These muscles allow a person to bend the toes and to raise the body on the balls of the feet. Four muscles at the front leg bend the foot upward and straighten the toes. The Achilles tendon is attached to the heel and extends up into the calf muscles. The kneecap is called the patella. The gluteus maximus is the main muscle in the hip. The pelvic bone connects the spinal column with the legs.
Description of the bones and muscles of the arm: The upper part of the arm contains one large bone called the humerus, which extends from the shoulder to the elbow, and connects them. Shoulder muscles known as deltoids are attached to the upper arm, and are located at the top part of the arm in the shoulder. Flexor muscles called biceps bend the arm at the elbow. The triceps muscles found at the back of the upper limb extend to straighten the arm. The lower part of the arm is called the forearm, in which the ulna and the radius are the two bones that extend from the elbow to the wrist. Attached to the forearm are 19 muscles that move the wrist and fingers. The clavicle and the scapula are two bones in the chest-upper arm area. The skull, of course, connects to the spinal column, which connects to the rib cage. (I just remembered the old song: "...the thigh bone's connected to the knee bone, the knee bone's connected to the leg bone...!")
There are also websites which deal with human anatomy and constructive anatomy, that have photographs and illustrations of the bones and muscles. One is:
When drawing the figure, perspective plays a role, as it does when drawing landscapes, interiors and still lifes. Unless you are viewing an object at eye level, and head on, you will see it at an angle as it recedes into the distance. If this angle is a sharp one, the resulting view can be drastically altered from the object's normal appearance. If a person is standing straight and in front of you, he or she will be located in one plane - straight up and down, in a "normal" position. However, if the person lies down, with his or her feet closer to you than their head, and you are sitting on the ground looking at them, their body will appear truncated, or abbreviated, appearing almost distorted. This is foreshortening. (See Illustration 20) In foreshortening, when you draw the figure as you see it, it can appear strange, like a fisheye camera view, or a surrealistic painting. The 'trick' is to do just that - draw the figure exactly as you see it. This can mean forgetting what you "know" about the figure, and drawing it exactly as it appears. Using the above-mentioned methods can help to accomplish this - comparing the heights and positions of body parts in relation to each other. When the body is seen in foreshortening, there will also be parts of the body which you will not be able to see; for example, you may not be able to see the chest and stomach area. So, even though you know that these areas exist in the person's body, they will not show up in your view or in your drawing. In foreshortening situations, the resulting view may be so extreme that you might want to even modify it slightly or somewhat, to avoid a weirdness in your drawing. This 'weirdness' may distract viewers away from the real subject of your drawing, or just be annoying to look at. On the other hand, you may want to keep, or even exaggerate, this distortion in your drawing, in which the proportions of body parts are often wildly varying. Practice drawing foreshortening by drawing yourself in a mirror, perhaps lying down with your feet closest to the mirror, so that your body is foreshortened. Ask your friends and family to pose for you in a foreshortened pose.
Constructing the Figure with Geometry
A useful approach to drawing the figure (or anything else) is to break the figure down into its parts in a geometric fashion. Since Cezanne, who advised to see nature as spheres, cylinders and cones, artists have used geometric forms to build the figure. The trunk of the body, for instance, is basically a cylinder, like an aluminum can, as is the head. Therefore, any anatomical parts or decoration on this cylinder will curve around the cylinder, as lettering on a can, or stripes on a shirt worn by a person, following the curve of the cylinder (See Cross-contour, above). Arms and legs are also basically cylinders. You could also think of these forms as a geometrical block form - rather than a rounded cylinder, they could be modified to the form of a cube, by adding four corners. The principle is the same. This is another way to acknowledge the three-dimensional quality of the human body, and to construct the figure on paper more easily by breaking it into its component parts. This is also a good way to begin a drawing, as an alternative to a gesture drawing. You can pencil in lightly the cubes of the upper trunk (above the waist), the lower trunk (below the waist), then the arms and legs, and head in this manner. Then you can begin to establish the actual contour of the figure, then add your shading.
Chiaroscuro (Shading of Lights and Darks)
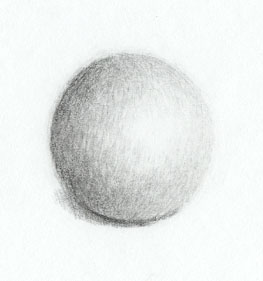
Chiaroscuro was developed during the Renaissance as a way to depict the three-dimensionality of forms (creating the illusion of depth), by the use of lights and darks. The lightest point on a form is called the highlight; this is the point on an object or form which is the closest to the light source shining on it. For example, on a beach ball, there will be one spot near the center or just off-center, which appears to be a little brighter where the light source (the sun or artificial light) is reflected on it. This spot will follow the form it is on, so on a beach ball, the spot will be round. The next brightest area will be the light area, which is usually larger than the highlight area, and on a beach ball will take up about half of the ball - normally being larger than the shadow area of the ball. The shadow area is the other part of the ball which is not lit, which is usually smaller than the light area; this area is darker than the light area, but is not the darkest area on the ball. The core shadow, on the beach ball, is a crescent shape, following the shape of the ball, and is the darkest area on the ball. Reflected light is a lighter (middle tone gray) area on the back edge of the ball (or other form), which occurs in the shadow area. It is caused by either reflected light, or light from a secondary light source. A cast shadow is the shadow cast by the form (beach ball) onto the surface it is sitting on (for example, the beach ball on the sand, or on a table). This cast shadow will enhance the object's three-dimensionality. In a rounded object like a ball or the human form, these shifts from light to dark will be gradual; in a geometric object, such as a box, the light and dark areas will have sharper edges. A box will have these sharply delineated planes (remember geometry class?); the rounded human form will have small, gradually altered planes; a beach ball will have planes that are so small as to be unobservable with the human eye (totally smooth surface). Though chiaroscuro is a convention for indicating form, it is better to subordinate it to observing each individual form from life, rather than following a general rule.
The human head is a modified beach ball (sphere), in terms of its form (an oval, or ovoid shape); so the formula of chiaroscuro will apply to it in the same way, with modifications. Depending on the light source(s), there will be at least one highlight area, and secondary highlight areas (slightly darker). On a face, light will often be most prominent on forehead, nose and/or cheeks; the location will depend where the light is coming from. Often, there will be more than one light source; usually one will be brighter. This complicates the indication of light and shadow; with practice you will be able to better deal with this complexity. The best way is just to learn to see - regardless of the light source, or the variations of light sources, you can learn to organize the forms you are looking at. If you are setting up your subject, you can determine where the light source comes from (in a self-portrait, for example, put a lamp on one side of you, or sit next to a bright window on one side). As far as forms, the eyes are actually rounded spheres, rather than flat; and the nose is really a pyramid, which usually casts a shadow onto the cheek and the "moustache" area. The upper lip is usually darker than the lower lip, which receives more light. Because the head is an ovoid shape, its features (eyes, mouth) will follow its rounded form - that is, the eyes and mouth will curve around the form of the head, just as the lettering on a can of peas will curve around its rounded form (like the mouth in a smiley face). You will learn to see shadows on a form, such as a face, as shapes in themselves, which follow the form they lie on. When you learn to see these shadow shapes in such a way (abstractly), you will take a great leap forward in your seeing and drawing. It just takes practice and learning to look at them as shapes in themselves.
The Whole Picture
Finally, approach the figure just as you would any other form - but you can also personalize your figures in many ways. Try to capture something of the model's personality or spirit; for instance, with the emotionalism of Van Gogh, or the sensuality of the sculptor Rodin's drawings. When you are a student, you will probably want to learn about anatomy, proportions, volume, etc. But eventually you may want your figure drawing to go further, and express something about the human race. Look at the figure drawings of many great artists, not only from the western hemisphere, but from the Orient as well (Chinese (toward bottom of page) and Japanese); look at drawings from centuries ago, and ones done in the last 10 or 20 years. Try different mediums, to stretch yourself. You can approach this subject from many angles, which will eventually coalesce into a whole vision - your personal vision.
Look at Chinese drawings where ink calligraphy is used. This handwriting of Chinese characters is also transferred to the brush and ink renderings of figures and other forms, in their art. Figures, animals and landscapes are done with a very able and expressive line, and simplified in a beautiful way. Oriental art is not as concerned with naturalism as western art is - with the illusion of depth, perspective, and three-dimensional volume. The brush and ink paintings have a line concerned only with tradition and two-dimensional design, as well as pattern, which has influenced modern western art greatly in its flatness and calligraphic line.
Another possibility is the use of the 'fragment' in art. Used by such artists as Rodin, the 19th century French sculptor, and Larry Rivers in 20th century America, the fragment replaces the whole form. Because what is left out of an artistic image is just as important as what is included, using a fragment to represent the whole can be a very powerful expressive device.
Finally, the personal approach to figure drawing may be the most valuable aesthetically. It is a goal for you to work toward in your art, and exists on many levels. Becoming aware of the personality and attributes of your models is a first step. Developing your own approach with your mediums and techniques is a second step. Once you have more experience, you can begin to develop your aesthetic approach; absorbing all of art history and using what is most meaningful to you, getting closer to your artistic vision. And finally, accumulating a life's work of original and personal expression, which will hopefully also be a universal expression.
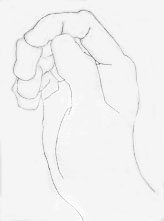
Illustration 1: Contour drawing - Do studies of individual body parts, as well as the entire figure.
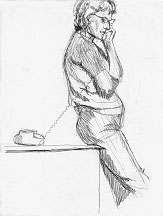
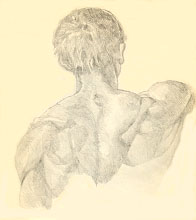
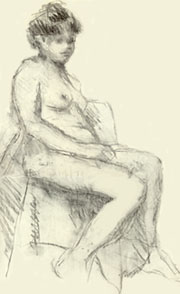
Illustration 2: Charcoal study of the nude model - Charcoal is great for figure drawing, because it is so easily erased or wiped off, when correcting positions and proportions of the parts of the figure.
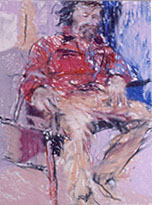
Illustration 3: Pastel figure study - Pastel can be a very direct, expressive medium. The expressionist quality of this study gives a feeling of movement or energy. Also, at some point, you will need to think about the composition of your figure studies - the placement on the page, the relationship of the figure to the edges of the paper, etc. See Design I,II,III and IV.
Illustration 4: Oil painting of figures at the beach - The beach is a wonderful place to draw the figure - quick gesture studies of people (wearing few clothes), who are taking interesting "poses." You can also do longer studies of people who are quietly reading, or sleeping.
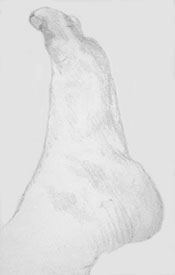
Illustration 5: Shaded pencil drawing of foot - Again, drawing individual parts of your own body is a great way to study the figure.
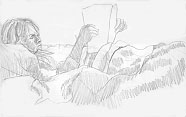
Illustration 6: Pencil study - Drawing your roommates, friends and family when they are relaxing is the best way to learn to draw. Here, I started with a contour drawing, then used hatching lines to shade the figure and blankets. (Hatching means to make quick, parallel strokes in one direction. Cross-hatching means making similar sets of parallel strokes in opposite or oblique directions to the first layer of hatch marks.)
Illustrations 7 and 8: (above and below) - Pencil contour studies of figure and head.
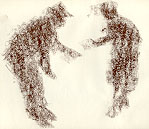
Illustration 10: Mass drawing of a man and woman dancing, in brown conte crayon - Mass drawings attempt to capture the volumetric quality of the figures.
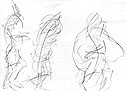
Illustrations 11 and 12: (above and below) - Pencil gesture drawings of figures - Gesture tries to capture quickly what the figure is doing, rather than what it looks like.
Illustration 13: Figure study done with ballpoint pen - Here, I first established the axis line of the figure (which can still be seen); then did the contours, then shaded some parts with hatch marks.
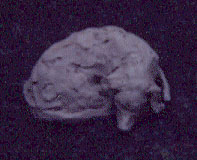
Illustration 14: Small (6") sculpture of dog done with self-hardening clay - Here, I just started with a small ball, and added bits and pieces until I got the form of my dog. I didn't "smooth over" all of the clay, giving the form a sense of bumps and indentations (a 3-D feel).
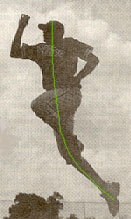
Illustration 15: Photo of an "airborne" figure, with green marking the axis line, or action line, of the figure. Try to get a feeling of movement or vitality, even when the figure is still.
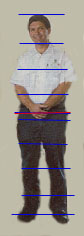
Illustration 16: Photo of standing figure, with general proportions marked in blue and red - The vertical center of the figure is found in the groin area (red line); the entire body is 7 to 8 times the size of the head (blue lines).
Illustration 17: Pencil study of the skeleton from an anatomy book for artists - Doing such studies will help you get a feel for the bones under the skin, and for movement of the figure.
Illustrations 18 and 19: (above and below) - Pencil studies of human muscles done from artists' anatomy book.
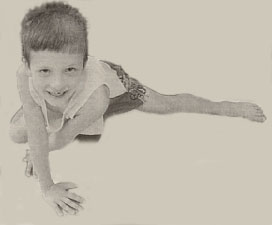
Illustration 20: Photo example of foreshortening in a figure - Here you can see how the "correct" proportions of the boy's body are greatly distorted - his foot seems very tiny compared to the size of his head, which is the closest to the viewer. Foreshortening means that the body is seen at an extreme angle of perspective, which distorts the proportions seen, and where some parts of the body are not seen at all, as his chest and stomach area are not seen here.
Illustration 21: Seeing geometric forms within the parts of the figure - Becoming aware of the underlying geometric forms of the figure can help you capture a sense of volume, whether the geometric forms are cylinders or cubes.
Illustration 22: Pencil drawing of a ball with shading indicating light and shadow areas (chiaroscuro). The highlight is the lightest area on the form; the light area is the second lightest area, usually larger than the highlight; the shadow area is the area of the ball in darkness; the core shadow area is the darkest part of the shadow area, in this case being a crescent shape on the left side of the ball. Sometimes, reflected light can be seen on a form, a middle-tone area near the core shadow area (left side of the ball); a cast shadow is seen under the ball, on the surface the ball is sitting on.
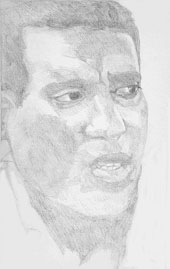
Illustration 23: Shaded pencil portrait - When you are able to see the individual shapes of the shadows (see them abstractly), you will begin to really see and draw forms as they appear. In a head, lights and darks will be more complex than a simple sphere; it will take practice to see these forms in light and shade. You can start lightly, and gradually shade the darker areas, as you become more sure of the positions and proportions of the head and the features. The head is also a cylinder, so the eyes and mouth will curve around it, just as the lettering on a can of peas will follow the curve of the can.
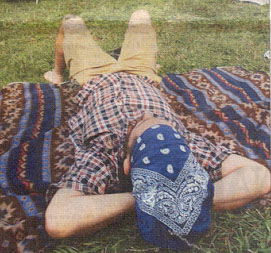
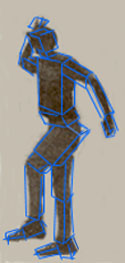
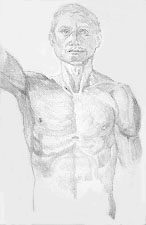
Illustration 9: Photo indicating three examples of cross-contour - The body is composed of parts which can be seen as geometric forms, such as a cylinder. Here, the rounded cylinder of his trunk is shown by the way the plaid pattern curves with his rounded form; the design of his scarf, when laid flat, is straight across - when he wears it on his cylindrical head, it forms a curve; the blanket he lies on also has decoration which follows the form of the blanket - up and down, curving, etc.