Canvas comes in two forms: canvas panels and canvas fabric. Canvas panels are a thin piece of canvas covering a lightweight cardboard, which come in many sizes, up to around 30 or so inches. These are ready to paint on when purchased, and are cheaper to buy than the materials and tools to stretch canvas over stretcher bars, in the traditional manner. They are good for beginners, or for those who don't wish to invest time and money in stretched canvas, however they don't have the permanence of paintings done on stretched canvas. I have two from about 50 years ago, and they seem to be in good shape; however, they aren't made to last as long as traditional canvas, so they are not good to use if you intend to sell your finished work, or want it to last for a number of years. Also available and ready to use are pre-stretched (and pre-primed) canvases, which come up to about 48 inches. These are okay to use, if you don't paint that often, but are more expensive in the long run than stretching your own canvases. There are also thin primed canvas sheets in a pad, usually about 9" x 12" or a few inches larger, that are okay, again, for a non-permanent use. There are two kinds of canvas fabric: cotton and linen. They are described in the following paragraph.
Materials Needed to Stretch Canvas
1.Canvas - Canvas comes in two materials: cotton and linen. Unprimed cotton is a natural off-white color, and is the least expensive. It comes in several grades of thickness and quality, and can be sold at 36" wide, or 50" or 60" wide, by the yard and by the foot. Normally you can use the medium quality and thickness, which sells for about $6 -$7 a foot (at 50 inches wide). Linen also comes in varied quality and weight, has a finer and smoother texture than cotton, and unprimed linen is light brown in color. I prefer the surface of linen for painting, however, it is more expensive. If you plan to do more than a few paintings, it is usually better to buy a larger piece of canvas, since less will be wasted with a larger piece when cutting for various canvas sizes. You can also buy a roll of canvas if you paint a lot. You can find fabric canvas, and panels and pre-stretched canvases in art stores; some office supply stores and department stores also carry canvas panels and pre-stretched canvases.
Both cotton and linen come primed and unprimed. Unprimed means that the fabric has not had the undercoat of priming material necessary before you can paint on it; however some artists have chosen to paint on unprimed canvas, calling their work 'stained' canvas, perhaps because they prefer the natural color to the harsh white of gesso, the priming material most commonly used. Primed canvas, then, means that the canvas can be bought either as a pre-stretched canvas or from a roll of fabric with the necessary gesso priming already on it. Or, you can do the priming yourself, with either commercially prepared gesso, or with rabbit skin glue, a more complicated process which involves mixing and heating the rabbit skin glue. I won't cover the process for rabbit skin glue here; it is a process which needs to be done correctly, otherwise at some point its surface will crack, before or after the painting has been finished. Professional artists generally prefer to buy canvas unprimed, and prime it themselves. I feel that already-primed canvas has a too-smooth finish, and lacks the natural feel of unprimed.
Pre-stretched, pre-primed canvases are a good compromise for hobbyist painters, since they are more permanent than canvas panels, yet are stretched and primed and ready to paint on. They are more expensive, however they come in various sizes 48" or under, and also some sizes come in oval shapes. They can be found in art supply stores, or online catalogues (www.utrechtart.com or www.dickblick.com). If you decide to go this route, you can skip the rest of the materials listed here, and start painting!
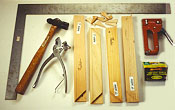
2. Stretcher Bars (See Illustration 1) - If you decide to be adventurous and stretch your own canvas, in the long run you will save money. Once you buy the necessary materials, you can save by doing it yourself. Four stretcher bars are used to stretch the canvas over. They come ready to use in sizes from 8" to 40" in regular size; and up to 60" or so for the heavy-duty stretchers which are best to use for canvases over 40". (For canvases over 40", it is best to brace the back or corners, if not using heavy duty stretchers.) A major brand for stretcher bars is Fredrix, and these are sold in art stores and some office supply stores. If you are handy with saws, you can make your own stretchers with wood from the lumber yard, a piece of curved molding, and a mitre saw. Me, I'd rather spend my time painting, so I buy pre-made stretchers. You also will need "keys" for the stretchers - small wooden angled chips, which are used to make the stretched canvas more snug in the corners. These used to be free, but now often you have to pay for them, and are usually found near the stretcher bars, in bags. You need 8 keys for each canvas. Note: When you buy the stretchers in the store, hold them against an even surface, like a metal cabinet, to make sure they are not warped. If you buy them online, you do take a chance that they will be warped, which happens once in awhile.
3. Small Hammer(See Illustration 1) - This hammer is used to join the stretcher bars together, or to hammer carpet tacks to attach the canvas to the stretcher bars, if you prefer them to using staples. You can find an artist's hammer in an art supply store - or any small one in a hardware store; you don't need the power of a humungous hammer.
4. Carpet tacks or Stapler and Staples - When I went to art school many years ago, we used small carpet tacks and a hammer to stretch our canvases. The carpet tacks are about 3/8 of an inch long. Most people now use a heavy-duty stapler and staples made for it (see Illustration 1). www.utrechtart.com has two staplers in their catalogue - a heavy duty one (about $15 at this writing), and an even bigger one, for $25. If you will be stretching canvases 40" or under, the smaller one is fine. Make sure you get plenty of staples that fit the stapler.
5. Canvas pliers(See Illustration 1) - These are special pliers used to grip the canvas while you attach it to the stretcher bars. You will find these at an art supply store, or in the Utrecht online catalog.
6.Right angle(See Illustration 1) - These are used to make sure that your canvas is square, i.e., all four corners are true right angles. They are made of metal; if you get one about 24" on the long side, that will be fine for canvases under 40". These are sold at hardware stores and sometimes art suppliers will have them.
That's it! Now you're ready to stretch your canvas.
Stretching the Canvas
Note: If your stretcher bars are 40" or longer, you will need to either use heavy duty stretchers (available at www.utrechtart.com), or put wood or other braces on the back of the canvas to reinforce the stretchers. The easiest thing to do is to use heavy-duty stretcher bars.
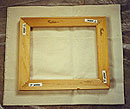
Find a flat surface, preferably a hard floor or flat carpet, and free of dirt or dust. Using a large piece of plastic will protect your floor or carpet from spilled gesso during priming. First, take your four stretcher bars and join them together at the corners, with all 4 stretchers having the brand name and inch measurement on the same side. (The grooves on each corner fit together.) You can do the initial joining by hand; once you get them started, you can use your hammer to get them more fully joined. Just get them so that they are almost as close as they will go; try to get them as square as possible, by hammer and by "twisting" them a little to even them out. Now, lay the joined bars on the floor. Lay the metal right angle so that it lies outside of the wood, its inside corner against one of the stretched canvas' outside corners. If your stretcher bars are at right angles, they will line up with the right angle for its entire length.
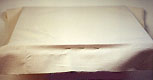
Next, lay enough of your canvas fabric out to cut your canvas size from it. (With canvas, try to keep it from getting sharply folded creases as it is stored, which will be hard to eliminate when it is stretched. This is tricky - just don't set anything on top of it, especially for long periods; try to keep it loosely folded. It also should be kept dry and away from moisture, which will cause mold.) Now, lay your stretchers on top of the canvas, in the place which makes the most practical use of the fabric. (I'm always trying to save some for more paintings - $$$.) You should leave at least 2-1/2" of canvas outside of the outside edge of the stretchers. Cut the canvas at 2-1/2 inches away from the bars in a straight line all the way around.
Usually, they're not aligned. It takes a little finagling, either by tapping the hammer on one or more stretcher bar corners, or by additional sideways twisting of the bars. When you get one corner aligned with the right angle, turn the canvas (clockwise) to check the next corner. If it is also aligned, try the third, then the fourth corner. If any corner is not aligned, it will take additional cajoling and fine-tuning. Keep checking until you get all four corners aligned in a row. (If you get two corners right, and the third is not, when you fix the third, you need to start counting over again at Number One.) Note: You don't need to join the stretchers all the way together - just about 95% of the way. You can also tap the inside of the stretcher to get it at a right angle to its neighbor.
Note: When the canvas is squared, I put two staples on each of the inside corner joints, on the middle of the mitre line of the corner, on the top of the wood as it lies flat on the floor, because the stretchers tend to wriggle around during the actual stretching of the canvas, and get unsquared. Stretcher bars have their measurements incised on their flat sides, e.g., 22 for 22 inches, so I put this staple on the same side as the numbers (the back side), so it won't be between the canvas and the stretcher, where it will stick out on the painting side of the canvas. (Stretched canvas must be protected from any protrusions, especially sharp, because even if they don't go through the canvas, they will weaken it. If a painted canvas gets poked on either side, it will eventually crack the paint, and this is very difficult to fix. I know, because it happened once to a painting of mine. Even though I tried to re-paint the area, it always ended up cracking again.) I leave the measurement numbers on the back side, so that after the canvas is stretched, I will still be able to see the measurements.
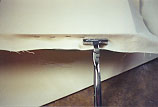
(If you are using carpet tacks, follow the instructions below, only using your tacks.) Now, put some staples into your stapler, if you haven't already. Lift the stretchers and the canvas up (with the stretcher bars between you and the canvas), so that the stretchers are centered in the middle of the canvas, holding the canvas toward you over the stretchers. In the middle of the top of the top stretcher bar, pull the canvas toward you with your canvas pliers so that it comes over the top stretcher bar and down - fairly tightly. Put one staple in the middle of the top stretcher bar (on the thin, top side), trying to keep the rest of the canvas from loosening around the other sides too much, and keeping all the excess canvas even. Now, keeping the canvas in position, turn the stretchers and canvas so that you can put a staple in the middle of the opposite side of the stretched canvas. When doing this side, you can use the canvas pliers in one hand, to pull the canvas down tautly, while you put your staple in the middle of this stretcher bar (see Illustration 3). The canvas should be pulled tightly - but not to the most extreme degree - this can be tricky, and comes with experience. If the canvas is not pulled tightly enough, the canvas will not be taut enough; if too tight, your canvas stretchers will not stay flat - one or more corners of the stretched canvas will pull foward in a warped position. (See Illustration 4.) Putting the keys in at the end, and priming the canvas will also tighten it a little more.
When you have put your second staple in, turn the canvas to the third side, making sure the canvas is still even and pulled toward you. Put a staple in the middle of this third side while holding the edge of the canvas down tightly with the pliers; then turn to the fourth (opposite) side of the canvas, and staple again in the middle of the top of that side. Using the pliers to pull down the canvas tautly, put a staple an inch away on both sides of the first staple, on each side of the stretched canvas (going from one side to its opposite side, i.e., side one, side three, side two, side four). Try to keep the canvas smoothly attached, that is, no bunching of the canvas between staples, or on the front of the canvas. If you get bunching, you will need to remove the staples involved before moving on. Go from the middle to the corners in this way, increasing one staple on each side (spaced up to 1" apart) each time you start with side one again. If your stretchers' dimensions are longer on one side, you can skip the shorter sides a couple of times, to keep them equal with respect to the space away from the corners.
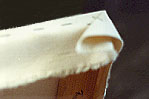
When you are within 2 inches of the corners, you can fold the canvas at the corners in the following manner: Working on one corner at a time and using the canvas pliers, put a staple on each bar 1" away from the corner: On the top of the right corner stretcher, the widest part that also has no groove in it, is the side closest to the front of the canvas. This is where you want to put your staple, about 1/4" away from the actual corner. Then turn your canvas so that the other side of the same corner is up. You want to pull the canvas with the pliers, then pull the excess canvas to the right down over the corner of the stretcher in a diagonal direction on the top of the stretcher (see Illustration 5). Then put a staple perpendicular to this diagonal line, on the side of the top closest to you, which will also be free of grooves. Do the same thing on the other three corners. The front of the canvas should now be smooth and taut, and free of noticeable creases or wrinkles.*
Now lay the canvas down on the plastic on the floor, front side down. First, remove the 4 staples that you placed on the corners of the stretchers to hold them square (a small kitchen knife will do). Take your 8 wooden keys, 2 at a time for each corner. On the inside corners, there are 2 small openings, one on each stretcher, one above the other. Put the pointy end of a key into the lowest opening, with the longest, straight side of the key away from the inside of the stretcher, as far as it will go; then tap the straight end until the key is securely in the hole. Tap lightly, not hard; and don't push the key in too far, just far enough to be snug. Take another key and put the pointy end in the higher opening on the other bar, and tap it until snug. Do the same for the other three corners, with the same snugness for all, so that the canvas will remain square. This will tighten the canvas just a little more on the stretchers.
*Your canvas should now be taut and smooth. If there are slight remnants of creases, priming the canvas will remove these, but if the creases or bulges are pronounced, you will need to remove some of the staples and re-stretch those parts of the canvas.
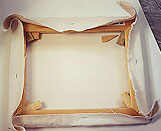
You can now put the canvas front side down on the floor, and staple the excess canvas to the flat part of each stretcher, once in the middle and at the corners, folding the canvas under, just to get the canvas "out of the way." You are now ready to prime your canvas.
Priming the Canvas
Materials Needed:
1.Gesso or other priming material - Gesso is the generic name for the most common priming material; it comes commercially prepared in various sizes of plastic jars. It is usually a bright white, fairly thick liquid, and can be found in art stores, and some office supply stores. I've heard that Liquitex and Winsor & Newton make a clear gesso. Another traditional primer is rabbit skin glue, which needs to be mixed and heated, and must be correctly prepared or it will eventually crack the surface of the painting. I currently use an acrylic gloss varnish to prime my canvases - mainly because it is transparent, and I prefer the natural color of the canvas over the chalky appearance of gesso; I always put three coats on. But I do not wish to recommend this method, as it is not as time-proven as gesso. One advantage of using gesso is that its whiteness will make your colors look brighter.
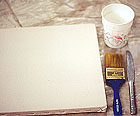
2.Gesso brush - A brush specifically made to prime canvases with gesso; it has nylon bristles about 2 inches long, and comes in widths of 1", 2" and 3". (See Illustration 7).Tara is a commonly used brand; a 2-inch brush will cover canvases up to 40" very well.
3.Plastic cup, about 8 oz. size - This is to hold your gesso. Plastic is easy to wash and re-use. I keep mine upside-down when not using it, so as not to gather dust, which will mix with the primer.
4.Stirrer to mix the gesso with water - Gesso normally is watered down slightly in order to more easily brush it onto the canvas. I use a dull kitchen knife to stir it, which I promptly clean, since gesso dries very quickly and is very hard to remove.
OK - you've come this far, congratulations! You're finally ready to prime your canvas.
First, stir your gesso well, with a butter knife or plastic stirrer (wipe off stirrer right away). Pour some gesso into your plastic container. Only pour as much as you will use, since pouring excess gesso back into the jar is not a good idea. Experience will tell you how much to pour, but roughly speaking, for a small canvas of 12" x 14", you might need about one-half to one inch in an average 8 oz. container. You will be putting on two coats of gesso. The gesso should be a little thinner than what comes prepared in the gesso jar, particularly the first coat. Carefully add just a small amount of water - read the jar label to find out how much water can be added safely. (The absolute maximum is usually about 25% - but you don't need anywhere near that much water mixed in.) Stir it well with the stirrer - and keep paper towels handy to clean the stirrer and wipe up any spills. Gesso is an acrylic product - meaning plastic and water soluble. It dries VERY quickly - and once it dries, it is not soluble. So you will need to prime your canvas quickly, without pauses.
Now, wet the bristles of your gesso brush, by running it under tap water, then squeeze it dry, so that it is just slightly moist. This is to keep the gesso from sticking to the dry bristles too much. For the first coat, dip the brush into the gesso so that the bottom 1/2" or so of the brush is covered with gesso. Wipe the brush against the sides lightly to remove any large excess amount. The first coat will be brushed in the same direction, either across the width of the canvas, or across the length. The second coat will be brushed in a direction perpendicular to the first coat. Brush the gesso in strips from one end to the other, about as wide as the brush, i.e., about 2 inches at a time. Gessoing is a combination of strokes - the housepainting stroke, and a circular stroke that kind of rubs the gesso into the fabric of the canvas. You'll need to brush it in with a little force. The final strokes will go in the direction of the strip - either of the width or length of the canvas, to smooth the stroke marks. You need to work quickly. When you finish covering the canvas with the first coat, you can also gesso the sides of the canvas, where the staples are; after you do a side, make sure that whatever gesso was then incidentally brushed onto the front of the canvas is smoothed over. When completely finished the first coat, immediately wash your gesso brush in soap and water. Keep the brush constantly wet, and lather the brush up, rub it into the palm of your hand to clean it, and clean between the bristles too. When done, squeeze dry and re-shape the brush, and leave it on the edge of a table, with the bristles not touching the table. Cover the gesso cup with a piece of plastic wrap. Let the canvas lie on the floor to dry.
5.Soap to wash the gesso brush - I use regular hand soap to wash the brush. Just don't use anything too gooey or oily, like Dove. You must wash the gesso brush as soon as possible after gessoing - it dries very rapidly, and will ruin your brush if not washed soon enough. Also, wash it thoroughly, including between the bristles and down near the ferrule (the metal part of the brush).
You need to allow the first coat of gesso to dry completely. The amount of time varies, depending on the time of year, and the humidity level. I always let the first coat dry for at least an hour; preferably more. The standard procedure for many artists is to lightly sand the dry first coat with fine sandpaper. Then wipe the canvas with a cloth to get rid of the sandpaper residue. (I recommend reading The Artist's Handbook of Materials and Techniques, by Ralph Mayer. It is a big fat book, full of detailed information about the proper way to do things. Each artist ends up doing things his/her way, usually.) Now gesso the second coat, this time brushing in a direction perpendicular to the first coat. The second coat is easier to put on, because it won't have to go as much into the crevices of the fabric. Make sure both coats are heavy enough to cover the canvas completely. (Some artists also sand the second coat when dry.) When finished, wash your gesso brush again, dry and reshape it, and leave on the edge of a table, bristles not touching the table. Wash out your plastic cup right away also; avoid pouring leftover gesso down a drain; if it hardens, you will have a good clog.
When dry, you can stand the painting vertically.
7.Scissors or Matte Knife for cutting a piece of canvas. Regular large scissors work fine, or a utility knife from the hardware store, with single-edged blades.
For putting a primer coat on your stretched canvas, see Priming a Canvas, below.
Allow the canvas to dry completely before painting on it. I usually let it sit overnight.